EDIT 10/10/12: Found more pictures.
 Making this decogging tool requires access to a welder, so if you don't own or have access to a welder (be it through friends or work), you will have to think up another way. If you're really willing you could make your own welder out of microwaves. Milling machines can also be used to make the tool as seen on The Back Shed, credit to Jarbar for making the tool and it's much prettier than my own (see right).
To make the twisting tool a section of steel bar was used, which is thick enough to sit over the pole of the motor and contact as much of the plastic without touching the windings. This needs to be wide enough to be able to be placed over the pole with a few millimetres of metal left on either side.
The length of this section needs to be enough for a good grip on either side if you want it to be extra strong, or a centimetre or two longer than the pole on both sides. For reference my finished tool is 15cm long, using two sections of 3x20mm steel bar.
First we have to make the part to grab onto the pole itself, using the first piece of metal. The only real way I found to do this was to drill out some holes in the centre of the bar then file it down to fit. To do this, you want to mark out a rectangle about the same size as the top of the pole and centre punch a number of marks for the drill, which should keep the chosen drill bit within the rectangle you have drawn. The drill bit you choose can either be small to allow you to drill around the edge, or large enough to take out most of the material while staying in the marks.
After drilling, we're left with a rather messy attempt at a rectangle, so file down the peaks left by the drill until you have a decent rectangle. Keep checking the size of it in relation to the pole, it needs to fit over the top of the pole without snagging, although keep it as tight of a fit as possible (see below).

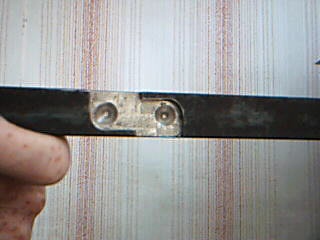
These two pictures show what happens when the tool is only checked with one motor, as I found out. It pays to check with multiple motors before you go and weld the rectangle cutout onto the reinforcement place, as it's a fun time filing it afterwards. Learn from my mistakes!


After filing down, the rectangle cutout to fit over the poles should look roughly like mine in the above picture. (disregard the bends on the left, I had tried that as a twisting tool, not successfully.)

As it is now, the rectangle *could* be used to twist the poles as is, but the thin sections of metal around the pole bend with little hesitation (see left). To fix this problem I chose to weld it to a second piece of metal which would serve as both a handle and a reinforcing section. If you haven't welded before, it's a good idea to practice with other pieces of metal until your welds look reasonable, the internet is a great place to find tips and how-to guides on welding. Personally I got a general idea about how to weld from ChuckE2009 on Youtube, worth a watch if you're into welding.
To weld the tool together you want to clean up both pieces of metal then weld the drilled out piece into approximately the centre of the other bar. Be careful about putting too much heat into the metal, as the drilled out piece will deform easily and it's a little bit harder to correct once the two are welded together.
At this point you now have a twisting tool. With the weld bead on the sides it may no longer fit over the stator pole without contacting the neighbouring poles, so you can grind these down. You may also have to touch up the inside of the tool if the welding has warped or deformed the metal, although this doesn't require an explanation. After it's nice and pretty now adding a coat of paint will protect it from rusting and keep it pretty for years to come.
Here's what my finished tool looks like, it's 15cm long, approximately 6mm thick and 2cm wide. If I were to do this again, I'd extend the tool maybe 10-20cm for more leverage.

Thanks for the read, hope you enjoyed! Here's how I used this tool to decog a SmartDrive motor.
No comments:
Post a Comment