 With Apple's need to make things as far away from normal as possible, I found myself with two Macbook's with smashed screens. To fix those would have cost $200+, so that was out of the question. I could have also brought an adapter for them, but that takes all the fun out of it!
Here's how I made the mini DVI to VGA adapter using some old ribbon cables used for connecting PCB's together (not IDE type ribbon cable), and an even older mini VGA adapter for the VGA port, and don't forget the 10K resistor!
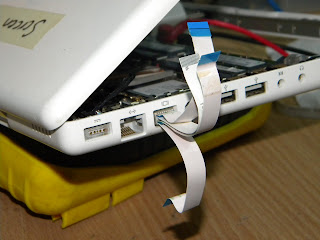
Testing which type of ribbon cable would fit in the port, this was before I looked at the pinouts on Wikipedia. For VGA the bottom two ribbon cables were the only ones needed, the top two were for DVI and I chose not to use this due to the fact if miswired something it would simply not work, rather than show me the issue with VGA.As can be seen below, the ribbon cables have the same spacing (although doubled on the cable) as the port, so that made wiring easier. I left the cable with the pins touching both pads on the cable, although a better idea would be to hack away at the side of the cable until only a single pad is contacted. This would give better contact, plus leaving a pad between the two to make wiring easier (could also introduce shorts...). I did have to hack away at one side anyway to make the cable fit.
And the underside of the connector, same thing here, although it is slightly closer to only contacting one pad/wire.
Okay, here's the fun part. Start separating the individual wires of the cable (or, if your connector makes contact with two of the wires, split them into pairs), making sure not to mangle it too bad.
Now check out the wiring diagram on Wikipedia and pick which pins of the connector you actually need for use with VGA's pinout. Tape up or cut off the wires/pairs which are either not needed or are not connected. (note to keep the 5V and detect pins)
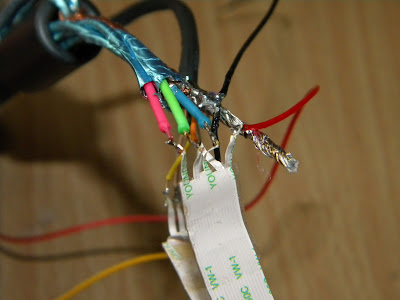
Okay, this is something harder to guide with. I just soldered all the wires that I needed from the VGA cable I initially used to the ribbon cables. (note, this was only a prototype, I modded it later to fit in a pretty case)
One thing that the pinouts don't include are the resistor needed to let the Macbook "detect" the monitor, in this case I used a 10K resistor, to pull the detect line to 5V (or connect resistor between detect and 5V pin, whichever terms you prefer). At the time of writing this I cannot remember where I got this value from, so give us a yell if you stumble across the reference.
View from another angle.
Apple planned the connector relatively well, leaving unused pins between the three colour signals (above), plus they also put most of the other signal wires together on their own side of the connector, making wiring the thing up a little easier. You can either connect all the grounds together or just use one.
Here's the fun mess before testing, all the signals are soldered up. If you are wondering where the detect resistor is, that's connected to the red and yellow wires, for testings sake.
Testing! Lucky I decided to use VGA, as this cable had no continuity through the red signal wire. Guess that's why the old CRT I pillaged it from was thrown out.
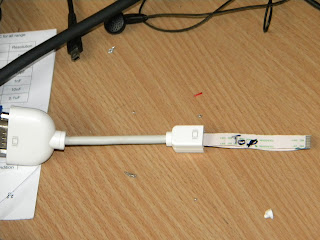
After some looking for other adapters to end up using to terminate it with, I decided upon this mini VGA to VGA adapter, rather obsolete now. Wasn't too hard to split open.
And again, not much detail on soldering it together. I used the continuity function on my digital multimeter to find which pins in the VGA adapter went to which wires. I kept the soldering job as compact as I could, so it would fit back in the case of the mini VGA plug.
Insulating it before putting it back in the case, using just regular sticky tape to keep the solder joints apart. The 10K resistor used to tell the Macbook a display is present can also finally be seen in this picture.
I was glad to see my finished version worked, and was much prettier than the ratsnest of wiring that was the first. Don't ever plan to go back inside the connector though, considering I drowned it in superglue.
And the adapter itself. I ended up using some insulation off old serial cables to hold the ribbon cables, else they would be susceptible to being pulled out and making a mess of the thing. As mentioned above, the connector was also held back together with superglue.
Thanks for reading! Feel free to drop a comment below if you have any questions or suggestions.


hi
ReplyDeletei am interested in ur hack i want to do one for my macbook air with micro DVI port please help my email is adudaniel74@yahoo.com and you can add me on facebook Danny wolf
Your a genius .. You have made my day.
ReplyDeleteI'm on it!!
Thanks.
i have an IBM flat monitor with a dvi single link port, and i want to make my own dvi to vga but i ont know how to match the pins
ReplyDelete.please help me, paul.worldstarbetting@gmail.com
nice! would like to see other mods u have going on. send me some links if u have some other mods up would like to see them.... kingdeftervsk@gmail.com
ReplyDeleteplease help with mini-dvi to vga adapter for macbook. i need scheme how to plag pins between connectors/ if you can make picture its been awesome
ReplyDeletekraftne@mail.ru
The device is ready to use right from the box with no software or drivers to install. Best vga hdmi here It's run with the built-in USB cable, so no external energy supply is necessary.
ReplyDeleteplz send wiring diagram dvi to vga converter
ReplyDelete