DISCLAIMER:
This post involves decogging a Fisher and Paykel Smartdrive motor, with the use of power tools, welders and human strength. If you're attempting this as well, I take no responsibility for injuries that may greet you.
Following along with my plans of making a wind turbine, this post shows how I went about decogging the motors. Reading through The Back Shed articles, the two main ways of decogging a Fisher and Paykel Smartdrive motor seem to be
1. grinding off the corners of the stator poles
2. twisting the stator poles.
For the sake of learning, I went with trying both.
NOTE
If you are following along at home, I recommend twisting the poles first, as once you've ground down the edges the amount of area for our twisting tool to grab decreases substantially. I learnt the hard way that when the tool slips our hands start moving rather fast towards the plastic pointy bits covering the motor, making for a bit of bloodshed and pain. Wearing thick gloves for this is advised whether you twist them first or last.
Twisting the poles
To start with, in the opposite order to what I actually did, twisting the poles first is a good idea. To accomplish this I went through a few prototypes.
The first real design of mine twisted and mangled itself due to a lack of support.

For further detail on actually making the tool, check out my previous post on it. Now to the actual twisting of the poles, which is rather simple.

After making the tool, the motor is secured and the tool is placed over the pole, making sure it makes full contact and is seated correctly.

The tool is then gripped, preferably with gloves, and one side is pulled towards you, while the other is pushed. It's likely the poles will make a crack noise, which is either the plastic cracking or the laminations moving. The tool is moved around the motor, repeating the process. 10 degrees is the angle to aim for, too little (like my attempts) and the decogging may not be as effective, too much and the poles will rub on the rotor.

Here's my finished motor, disregard the rounded poles. It's quite shy of the 10 degrees I should have been aiming for but it seems to do well enough as is.
Rounding the poles
Okay, this section is also rather self explanatory. All you want to do is get a hold of some manner of belt sander or disk sander or the likes (files can be used, as well as angle grinders if you are very careful) and round the top of the poles.
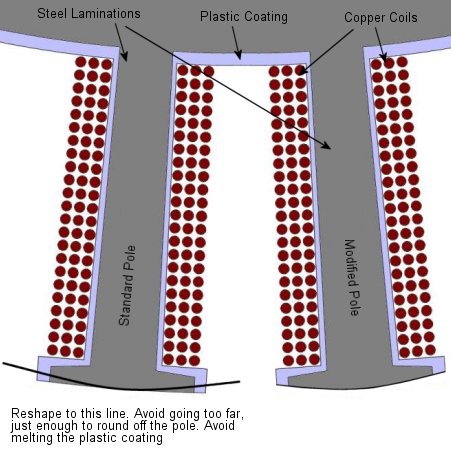
This graphic, from The Back Shed is all the guidance you should need in rounding the poles.
As mentioned in the graphic, you only want to remove about half the material at the edges, while being very careful to not damage the windings.

This is what the poles on the motor I decogged looked like afterwards. This is pretty much the amount of material you want to take off, as to not interfere with the windings.
Conclusion
After all that, chances are you'll have a pretty good decogged SmartDrive motor, as suitable for use in a multitude of backyard power generating projects with minimal blood loss. Hope you enjoyed this post and possibly made a useful tool out of it!
If you have any comments, criticism or questions about this post, feel free to drop them below!
No comments:
Post a Comment